Stranger Things at Coffee and Code

Like season 2 of Stranger Things, Coffee and Code is adding some new characters. One of those new characters is me, Chris. I bring some new skills which will help to round out the Coffee and Code team. For example, while completing a masters degree I worked with a computer vision algorithm called seam carving. Seam carving is a great algorithm to demonstrate how the team’s capabilities are growing since what it does is immediately visible.  I’m going to tell you a little about how seam carving works and give some examples from the latest season of Stranger Things 2. There should be no spoilers here, but we will be working with images from the latest season, so you may want to turn back now if you have not watched the entire season yet.

Seam carving is a technique for adding or removing portions of an image without changing the main elements of that image. The devil is always in the details, but from a high level the process is pretty basic. The algorithm analyzes an image to determine which areas are less interesting. Then, it carves seams through those areas in ways which are hopefully not noticeable. Easy peasy.

We were thinking of interesting ways to demonstrate seam carving, and then we started watching Stranger Things 2. We love Stranger Things – well, we love most things about it. One of the few things about the current season of the Netflix hit that we would change is the number of blatant product placements. We get that they probably had to come up with extra funds to bring on Sean Astin for such a large role, but it often seems that entire scenes were built around product placements. So, Jon thought that we could fix this little flaw in our favorite show by carving out all of the product placements.

We expect seam carving to do a fairly good job of removing items from basic images, but also expect it to fall down quickly when given more complex scenes. Let’s consider a somewhat straight forward example.

When we run the image above through a seam carving algorithm we can bring the group closer together. The image has some distortions, but all of the important parts have been pretty well preserved.

If, however, we run a more complicated scene through the algorithm, the results are not that great. Let’s consider the scene where Steve and Nancy visit Barbara’s parents.

The algorithm preserved the details of the product placement and it made the people look like they were attacked by Demodogs. That’s the exact opposite of what we want to have happen.

The reason for the poor performance is that the algorithm thinks that all the high contrasting details present in the middle of the scene must be more important than the less detailed areas near the edges of the image. Of course, that was probably a large part of the intention of this scene — to prominently feature the KFC bucket meal. According to our unbiased algorithm, KFC got its money’s worth out of this scene.

The performance can be greatly improved if we give this algorithm some hints. It needs its paddles! We could add an object detection algorithm to find all the known objects in the scene, and then classify each for preservation or removal. But, for now, we just will manually mark which portions of the image to remove and which ones to preserve. Below is the result when we marked the KFC bucket for removal and marked the people to be saved.

While we were thinking of ways we could “improve” Stranger Things 2, we talked about removing some of the new characters.

If we were upset that Max beat Dustin’s Dig Dug record, we could tell the algorithm to scrub her out of the scene.

We didn’t got too much further down this path, especially after the episode where Max … well, we’re not going to spoil that for you. The next steps towards automatic product placement removal would be to add in some sort of object detection, perhaps using a neural net trained on product logos from the 80s. To remove characters we could add facial recognition after the object detection step. But, that will have to wait for another time, we need to go finish watching season 2.

Images copyright of Netflix and the awesome group from Stranger Things.

Responsive Graphing and Charting Using HTML5 Canvas

Recently we were tasked with creating a dynamic chart and graph for a client who is in the B2B Coaching space. They wanted this chart in a dynamically created PDF as well as in their responsive web application. In this post, we’ll talk about how we solved this problem in their responsive web application using zero Javascript dependancies for an added performance win.
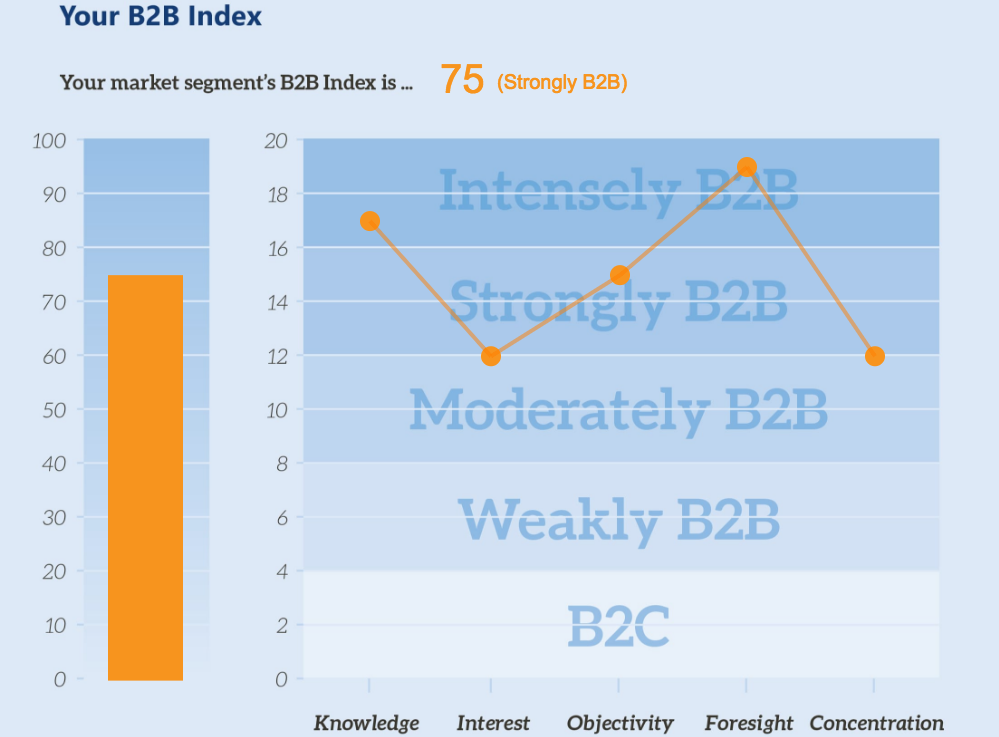
Finished Product

You can view all of the code related to this post on Codepen with this link.

See the Pen Responsive Charting and Graphing with the HTML5 Canvas Element by Byron Delpinal (@coffeeandcode) on CodePen.

Client Application: https://b2bmarketview.theaiminstitute.com/

Fair Warning: This post is going to be dry and code-heavy, but there’s some pretty cool stuff in there if you can stick with me.

Technical Requirements

  1. We will use an image for any static content with-in the charted area.
  2. The dynamic content will be generated by vanilla Javascript to mitigate the need for bringing in any external libraries.
  3. All measurements when drawing will be percent-based to keep the drawing responsive.
  4. The dynamic content will be stored as data- attributes on the canvas element.

Markup

We want to be as minimal as possible here. The bare-bones of what we need are an image, a container to hold that image that will resize to be the exact size of the image, and a placeholder for the canvas drawing.

<div class="b2b-graph-container">
  <img alt="B2b index graph" class="b2b-graph" src="/pathtoyourimage/image.png"/>
  <canvas data-aggregate="58" data-knowledge="14" data-interest="7" data-objectivity="6" data-foresight="11" data-concentration="20" id="graph-canvas"></canvas>
</div>

Javascript

There is a lot of Javascript required to make this work. I tried my best to keep things modular and abstract things when it made sense. Hopefully this will make this a bit easier to digest.

The initial JSON objects used to store the known values of the bar graph and each line graph point:

var barGraphElement = {
    maxAmount: 100,
    scoreAttribute: 'data-aggregate',
    width: 7.5,
    xCoord: 10.8,
    yScale: 10
  },
  lineGraphElementList = [{
    maxAmount: 20,
    scoreAttribute: 'data-knowledge',
    width: 1.25,
    xCoord: 37,
    yCoord: 0,
    yScale: 2
  }, {
  // All other points on the line graph
  ...
  }];

When our page is loaded, our application.js file runs conditional code to see if we need to draw our graph on this page or not. That looks like this:

var canvasElement = document.querySelector('#graph-canvas'),
    graphElement = document.querySelector('.b2b-graph-container');

if (canvasElement && graphElement) {
  drawGraph(window, graphElement, canvasElement);
}

This separates our concerns a bit having the application logic finding the required elements and passing them into our actual drawGraph function. Our drawGraph doesn’t necessarily care about what the elements are, or what context is used, it only knows about drawing the graph.

When we know that we should be drawing our graph on this page, we need to wait for our image to load before doing anything else. There’s a .complete method for images that can be used like this:

var imgElement = container.querySelector("img");

if (imgElement.complete) {
  // The image is already loaded!
  initializeDrawing()
} else {
  // The image is not loaded, let's attach an event handler to it
  imgElement.addEventListener('load', initializeDrawing, false);
}

Our initializeDrawing function handles the main logic flow, here it is, I’ll break it down below:

var initializeDrawing = function     initializeDrawing() {
  var context = canvas.getContext('2d');

  resizeAndPositionCanvas(canvas);
  updateContainerOffsets();

  // Set the stroke color
  context.fillStyle = '#ed1c24';
  context.strokeStyle = 'rgba(255,0,0,0.5)';

  // Draw the overall score
  drawOverallScore(context);

  // Draw the bar graph
  drawBarGraph(context);

  // Draw the line graph
  for (var i = 0, l = lineGraphElementList.length; i < l; i++) {
    var currentItem = lineGraphElementList[i],
      previousItem = lineGraphElementList[i-1];

    // Draw the current point on the graph
    drawLineGraphPoint(context, currentItem);
    // Draw a line from the current point to the previous point
    drawLineGraphLine(context, currentItem, previousItem);
  }

  global.addEventListener('resize', resize, false);
}

The first thing that we do is grab the 2D canvas context that we will pass around and use to draw everything we need to on the canvas element.

Next we’ll need to position the canvas directly on top of the image, so the resizeAndPositionCanvas() function takes the canvas element and manually sizes it to be 100% of the parent container of the image.

After that, we call the updateContainerOffsets() function that updates the canvasContainerOffsets object that we’ll be using later on.

After we’ve changed our drawing colors to red, it’s time to start putting some things on our graph! To do this responsively, there’s one key concept that we need to understand: Everything must be measured in a percent based on the parent container.

Diving right into the drawOverallScore() function, we see this:

var drawOverallScore = function drawOverallScore(context) {
  context.font = getPixelWidthFromPercent(4) + "px Arial";
       context.fillText(canvas.getAttribute(barGraphElement.scoreAttribute),
  getPixelWidthFromPercent(44),
  getPixelHeightFromPercent(15.5));
  };

It’s pretty straight forward, we’re just using the fillText function to put the text on the page. The weirdness comes from converting our percentages into pixels, which we’ve abstracted away into the getPixelWidthFromPercent() and getPixelHeightFromPercent() functions. Here they are:

var getPixelHeightFromPercent = function getPixelHeightFromPercent(percent) {
  return canvasContainerOffsets.height * (percent/100)
};

var getPixelWidthFromPercent = function getPixelWidthFromPercent(percent) {
  return canvasContainerOffsets.width * (percent/100)
};

Remember talking about seeing the canvasContainerOffsets object again later? Here it is. Anytime the screen is resized, we recalculate the width and height of the parent container so we can use them at anytime to convert percentages to pixels quickly. That code looks like this:

// Add the event listener
global.addEventListener('resize', resize, false);

// Handle the callback
var resize = function resize(event) {
  updateContainerOffsets();
};

// Update the offsets
var updateContainerOffsets = function updateContainerOffsets() {
  var parentElement = container;

  canvasContainerOffsets = {
    height: parentElement.offsetHeight,
    width: parentElement.offsetWidth
  };
}

Now, we can draw the bar graph:

var drawBarGraph = function drawBarGraph(context) {
  var currentItemScore = canvas.getAttribute(barGraphElement.scoreAttribute);

  context.beginPath();

  var distanceFromTop = calculateDistance(barGraphElement.maxAmount-currentItemScore, barGraphElement.yScale);
  var barHeight = calculateDistance(currentItemScore, barGraphElement.yScale);

  context.rect(getPixelWidthFromPercent(barGraphElement.xCoord),  getPixelHeightFromPercent(universalDistanceFromTop + distanceFromTop),
    getPixelWidthFromPercent(barGraphElement.width),
    getPixelHeightFromPercent(barHeight));

  context.fill();
};

var calculateDistance = function calculateDistance(score, scale) {
  var distanceBetweenEachMarker = 6.2;

  return (score / scale) * distanceBetweenEachMarker;
};

Admittedly, that context.rect() call is a bit weird, so I’ll dissect it a bit. If you check out the canvas rect documentation you’ll see that the parameters are .rect(x, y, width, height) – so we’re defining the x and y starting points, and then the width and height from there. Recall that our barGraphElement has maxAmount, width, xCoord, and yScale properties on it. These, along with the scoreAttribute from our data- attributes will be what we need to complete our goal here. The width is a set percentage, as is the xCoord.

Because of the nature of the .rect() method we will start from the top of the shape and define it from there, this means that we must figure out where the top of a dynamically sized shape. This may seem odd at first, but because we have a background image with horizontal markers on it, the problem isn’t too difficult. It work out to something like this:

((maxAmount - currentScore) / (maxAmount / numberOfMarkers) * distanceBetweenEachMarker) + universalDistanceFromTop

(maxAmount - currentScore) – This gives us the amount of distance from the top of where the bar graph will be, to the top of the bar graphs maximum amount. If our score was 60, we know that it’s 40 from the top. We have to then divide that by the scale. The scale is calculated by seeing how many markers we have (10) and dividing that by the maximum score (100) – in this case, our scale is 10. After we have that, we multiply it all by the distance between each marker to get the final distance as a percentage between the top of the bar graph and the top of the maximum bar graph. Finally, we add the distance from the top of the bar graph to the top of the page. At this point, we know where the top left corner of our bar graph will be, as a percent based on our full image. This is all handled in the above drawBarGraph() and calculateDistance() functions.

As it turns out, we can apply that same logic to draw all of the other things that we need to on our graph. The only two things remaining are the line graph points of intersection, and the lines themselves.

We see above in the initializeDrawing() function that we are looping through each point and using the current item to draw the point, and the current + previous point to draw the line. Here are those functions:

var drawLineGraphPoint = function drawLineGraphPoint(context, currentItem) {
    var currentItemScore = canvas.getAttribute(currentItem.scoreAttribute);
    // We  inverted the coordinates by subtracting it from the maximum since (0,0) is in the top left of the coordinate plane:
    var distanceFromTop = calculateDistance(currentItem.maxAmount-currentItemScore, currentItem.yScale);
    //Since the y distance is only the distance from the top of the plane to the value, we account for the  top buffer of space as well:
    currentItem.yCoord = universalDistanceFromTop + distanceFromTop;

    context.beginPath();

    context.arc(getPixelWidthFromPercent(currentItem.xCoord),
    getPixelHeightFromPercent(currentItem.yCoord),
    getPixelWidthFromPercent(currentItem.width),
      (Math.PI/180)*0,
      (Math.PI/180)*360,
      false);

    context.fill();
};

var drawLineGraphLine = function drawLineGraphLine(context, currentItem, previousItem) {
  if (!previousItem) {
    return;
  }

  context.beginPath();
  context.lineWidth = 4;

  context.moveTo(getPixelWidthFromPercent(previousItem.xCoord), getPixelHeightFromPercent(previousItem.yCoord));
  context.lineTo(getPixelWidthFromPercent(currentItem.xCoord), getPixelHeightFromPercent(currentItem.yCoord));

  context.stroke();
};

So now, we’ve drawn our score onto our graph, our bar graph, and our line graph. Presto, they now work on all screen sizes, using no external Javascript dependencies. Performance win, responsive win, all around win.

If you’d like to learn more about how responsive and performance based approaches can build better web software, we’d love to talk. Please visit us at www.coffeeandcode.com.

What does AWS Lambda support?

Anyone who’s developing in JavaScript knows the extremely useful features that have been creeping into Node and different web browsers. They also know the frustration of determining which features are supported and the pain of forced polyfills and code transformations tacked onto our build processes.

At Coffee and Code, I’ve been doing quite a few projects involving AWS Lambda which provides a Node.js runtime, but I kept having to look up whether I could use a specific ES6 feature or not.

How do I find out what features are supported and which I’d require something like Babel for?

Kangax provides a great resource for determining what features are supported in different JavaScript environments. However, they only show the major versions of Node.

node.green is a fairly new resource that focuses on more releases of Node and also utilizes the Kangax test suite, but they don’t list results for older versions of Node.

That’s why I built whatdoeslambdasupport.com, a website to quickly see what tests pass or fail for each Node runtime that AWS Lambda supports.

The tests results are generated by running the Kangax tests inside each of the Node.js Lambda runtimes so there’s no “it works on my machine” issues with the test results.

You can use this resource to determine what JS features you can use in your Lambda projects, or to make a call whether including something like Babel makes sense.


If you’re interested in hearing more about how I’ve used Lambda for client projects, I’ll be speaking at Pittsburgh TechFest and Erie Day of Code over the next couple weeks. Stop by and say hello!

Converting Documents with OpenOffice / LibreOffice

Did you know that you can convert documents with a headless version of OpenOffice or LibreOffice? If you pass a few commands to the soffice binary, you can convert one document type to another.

My examples will include paths for LibreOffice on a Mac, so make sure to adjust accordingly.

The following will convert all Word documents on my desktop to PDFs in the convert folder on my Desktop:

HOME=/tmp TMPDIR=/tmp /Applications/LibreOffice.app/Contents/MacOS/soffice --headless --convert-to pdf:writer_pdf_Export --outdir /Users/jon/Desktop/output/ /Users/jon/Desktop/*.doc

Make sure to include HOME=/tmp TMPDIR=/tmp before the command or it will run into permission issues and be unable to complete the file conversion.

Some believe writing files to the /tmp directory is a better approach, but I didn’t end up trying it myself.

Thanks to: https://ask.libreoffice.org/en/question/2641/convert-to-command-line-parameter/

Returning Simple Data with Tastypie

It’s not everyday that I find myself in the land of Python, but I recently started working on a project with a friend’s company to help them reach an upcoming deadline.

The project uses Tastypie to generate an API based on Django models, which works great! However, when I wanted to return generic data I ran into a bit more resistance than expected.

The API pointed me to Using Tastypie With Non-ORM Data Sources, though I was hoping for something less heavy handed. I didn’t want to make resourceful routes around a custom data source, I just wanted to return a simple json object.

I ended up with the following solution:

# Custom object that we'll use to build our response.
class CustomResourceObject(object):
    def __init__(self, name=None, label=None):
        self.label = label
        self.name = name


# The Tastypie resource that will return our data.
# Make sure to inherit from Resource instead of ModelResource.
class CustomResource(Resource):
    # You will need to add fields for each property
    # that will be returned in the response.
    label = CharField(attribute='label', readonly=True)
    name = CharField(attribute='name', readonly=True)

    class Meta:
        # Start by disabling all routes for this resource
        allowed_methods = None
        # Allow the `get` index call where we will return data
        list_allowed_methods = ['get']
        # Use the custom object we created above
        object_class = CustomResourceObject
        # API endpoint for this resource
        resource_name = 'custom_endpoint'

    # Create our array of custom data
    def get_object_list(self, request):
        return map(lambda val: CustomResourceObject(label=val[0], name=val[1]), DjangoModel.CHOICES)

    # Return our custom data for the API call
    def obj_get_list(self, bundle, **kwargs):
        return self.get_object_list(bundle.request)

Photo via Visual hunt

You Promised Me!

I absolutely love Promises in JavaScript code. As a person who started their programming career in DHTML I’ve seen a ton of new features added over time, but none have seemed as powerful as being able to control the flow of my software.

I want to focus on one aspect of Promises for this post though, exceptions. If a Promise function has an exception thrown, the promise will be rejected with the exception as the value.

Here’s an example:

new Promise(function(resolve, reject) {
  throw new Error('ARGHHH!');
}).catch(function(error) {
  console.log('The error is:', error);
});

What I don’t have to do is to do any try / catch to make sure the exception does not halt my program. Great!

One thing that sometimes slips my memory though is that the implicit catching of errors is only done on the function being executed inside the Promise (the executor), it does not extend to other callbacks that are called by that method.

const fs = require('fs');

new Promise(function(resolve, reject) {
  // Error thrown if the file "post.md" does not exist
  fs.readFile('post.md', function(err, data) {
    if (err) throw err;
  });
}).catch(function(error) {
  console.log('We will never get here.');
});

If the file post.md does not exist, Node will throw an along the lines of: Error: ENOENT: no such file or directory, open 'post.md'. That error will not be caught and your app will have a bad day.

The reason is that the callback executed in the readFile method creates a new context for execution and you have to rely on normal try / catch logic if your intent is for the Promise’s final catch statement to have your error.

const fs = require('fs');

new Promise(function(resolve, reject) {
  fs.readFile('post.md', function(err, data) {
    try {
      // It's now ok to throw an error here.
      // You can also just reject it.
      if (err) throw err;
    } catch (error) {
      // Reject any caught errors.
      reject(error);
    }
  });
}).catch(function(error) {
  console.log('The error is:', error);
});

Hopefully this helps you make sure your code’s flow control is exactly as you intended.


Sign up for our newsletter to learn some more tips and tricks, or just keep up to date on what we’re doing.

If you’d like to teach those tips and tricks to your team, we offer coaching and training opportunities for existing team members at your company.

Cleanup Docker Images and Exited Containers

It’s pretty easy to accumulate Docker containers and images on a development machine. Normally, every container that is ran is preserved on your machine. Try running docker ps -a and see how much you’ve accumulated over time.

Concerned about loss of disk space over time, I found a blog post that talked about cleaning up after Docker. Part of the article talked about removing dangling images, or intermediary images that are created while building other containers.

docker rmi $(docker images -f "dangling=true" -q)

However, I also wanted to clean up exited containers that accumulate from running docker-compose run commands, but leave the containers that are automatically started and stopped from running docker-compose up.

I ended up with the following bash alias to help me retrieve previous disk space:

alias docker-cleanup='docker rm $(docker ps -a -f "name=_run_" -q) && docker rmi $(docker images -f "dangling=true" -q)'

As a bonus, here’s the bash alias I use to quickly connect a terminal session to the default docker-machine.

alias docker-setup='docker-machine start default; eval "$(/usr/local/bin/docker-machine env default)"'

Prioritizing Performance: Completing a performance audit using Web Page Test

Optimizing a website for performance is hard, but that’s what makes it fun! When you plan to accomplish a goal, it’s never a good idea to go from 0 to 100 immediately. Whether it’s running a marathon, getting out of debt, or learning to wake up early in the morning – you have to take things one step at a time. This applies to improving performance as much as it does to these other examples.

The first step to improving your site’s performance is to establish a baseline of where it is at today. What we’ll need to do is a performance audit. This is an in-depth, instantaneous look at the performance of a website.

Enter Web Page Test

Web Page Test provides you with a very detailed view of what’s happening on your website. Here are a couple key metrics that you need to pull out and begin to document:

  1. Load Time (Document Complete Time)
  2. Time to First Byte *
  3. Start Render
  4. Speed Index **
  5. Fully Loaded Time

These are the high level items that you’ll want to be able to reference, but for this audit we’ll go a bit more in-depth to see what’s really going on behind the scenes. To do so, we’ll need to track data from each call that is made from the site. From each call, we’ll want to know:

  1. Mime Type
  2. URL
  3. Size (KB)
  4. Request Start Time
  5. DNS Lookup Time
  6. Initial connection time
  7. Time to First Byte
  8. Content Download Time
  9. Total Time Taken

Once you’ve arranged all of this data in a spreadsheet I’m sure your first question is something like this:

What does all of this data mean!?

You, probaby

With this information we’ll be able to pinpoint exact situations where we can improve, we just need to know what to look for. Let’s look at a quick example to outline a scenario that we should be looking for:

SVG Chart Example

Here we can see that we’re loading in 5 SVG images. These images take a total of 597ms to perform a DNS lookup, establish a connection, and wait for a first byte. That means that half a second went by, and we haven’t even started to download these images! Granted, some of these things could be happening synchronously, but we can all agree that it’s a bit of a waste for five images that take 0ms to actually load because of their small size. An easy improvement to this is to create a sprite sheet, reducing all of the inherent network latency involved in calling a server five times over again into one call.

For those unfamiliar:

[Sprite Sheets] are important for website optimization because they combine several images into one image file to reduce HTTP requests.

From Guil Hernandez at the Team Treehouse Blog

Please keep in mind that the sprite sheet optimization technique (hack?) is for a website following the HTTP 1.x protocol. This is considered an anti-pattern in the newer HTTP2 protocol. You can read about the HTTP2 protocol here. For a more concise translation regarding the switch from HTTP1.x to HTTP2 check out this post by Matt Wilcox

This scenario should hopefully give you an insight into what we’re looking for as we sift through this data. Every site and scenario will be unique, so I’ll let you dissect away!

When all is said and done, you should be able to get some valuable data by aggregating the call times by sections. Ours came out looking like this (Y-Axis is time in milliseconds):
Performance Graph

Are you noticing a lot of initial connection and time to first byte time, but not a lot of content download time? It seems like you might want to try combining some assets to make less HTTP requests! Are you seeing high content download times? You might want to try compressing your assets to decrease their size to a more reasonable level!

Hopefully with this information you’re ready to audit your own website and begin prioritizing performance!


* If you’re using a CDN like CloudFlare and Gzipping your files, you shouldn’t be worrying about the Time To First Byte metric as stated in this post by Cloudflare themselves.

** The math behind a Speed Index Score is very interesting, and best described in this page in the Web Page Test documentation.

Running Tests Automatically With Watchman

I’m currently working on a very small PHP library for a client and was looking for a way to automatically re-run the test suite anytime a PHP file is updated, added, or deleted.

A similar library on the Ruby side of the fence is called guard, which listens for file events and runs commands in response. I’ve used guard in previous projects, but I try not to pull in dependencies from other programming languages if possible in projects. Also, guard represents something that I’m trying to minimize in my development process which I’ll call a “wrapper application”.

“Wrapper Application”

I’m not sure if there’s a better word for it, but I’m going to talk about “wrapper applications”, or a library that wraps the core functionality that I’m trying to work with. In this case, it’s calling a command in response to a file system change. To get to the library that is actually doing the watching, guard pulls in listen, which pulls in rb-fsevent who does the actual monitoring.

If rb-fsevent makes a breaking change (or fixes a bug, or adds new functionality) I will have to wait for the listen library and the guard library to add the new functionality. I’ve been burnt many times before (I’m looking at you Grunt and Gulp plugins) so I try to minimize wrappers whenever possible. The fewer moving parts, the better.

All of that said, composition of libraries is not a bad thing, just something I like to look out for. Now, back to the story.

Enter the Watchman

When trying to find applications that could fit my need without being a “wrapper”, I ran into two other brew installable apps called fswatch and fsevent_watch, but their cryptic usage instructions and command line arguments led me to find Facebook’s Watchman. It’s open source, been out for a few years, and seemed to be able to meet my needs without requiring a “wrapper” library. In addition, it seemed to be pretty robust.

Installing is pretty straight forward thanks to brew install watchman and the introduction on their website looked straight-forward, but then things went downhill quickly.

The documentation doesn’t give many example setups, so it took a few read throughs before I found how to watch files and trigger commands in response. Unfortunately,
running the test task isn’t very helpful if you never see its output.

Turns out that normally triggered tasks send their output to the watchman log file that’s conveniently buried deep on your system’s bowels. Since I didn’t want to tail a file, I kept poking around in the documentation till I found the watchman-make command. It’s a convenience command that invokes a build tool in response to file changes while sending command output to your terminal. It met my needs and didn’t require any complicated setup of triggers or watchers.

While digging through documentation I also found that watch-project is preferred to the deprecated watch command so that overlapping watch commands can use a common process to be easier on the operating system.

That brings the command needed for my project to:

# Run this command to monitor PHP files and run phpunit in response.
watchman-make -p 'src/**/*.php' 'tests/**/*.php' --make=vendor/bin/phpunit -t tests

It was a bit of a journey to get everything working properly the first time, so hopefully this information will be helpful to others looking for a similar setup.

How to be a Good Developer

I was fortunate enough to be asked to talk to Wadsworth High School students again at today’s High School Career Day. It was a very well organized event and I was proud to be a part of it. I have had quite a few role models that helped shape my personal tech journey and I like to give back when possible.

While last years talk focused on a mixture of entrepreneurship and tech, this year I wanted to talk more about differentiating yourself in an industry that’s attracting more and more people everyday. The following are a few of the topics we covered in case it’s helpful to someone else.

Do What You Love

I’ve found the easiest way for me to learn new things are do to the things that interest me, and constantly learning new things is very important to your development as a developer.

Thankfully my desire to program on the web turned into a pretty good career as well.

An important thing to remember is that at some point in your personal development you will reach a point where you become stuck. The amount of knowledge you have yet to achieve will leave you confused about where to go next. I’ve found that focusing on the things that interest me and not the new and shiny worked quite well. One thing will lead to another in tech, but you should never get discouraged with the expectation that you should learn it all.

Speak Out

I owe a lot of my company’s growth the local special interest groups that I found through sites like meetup.com. I ended up with an entire network of amazingly smart and helpful people that have allowed my business to spread word of mouth.

We grew together, learned together, and helped each other meet our career goals.

For me, giving a talk at meetups led to speaking at conferences which were an excellent way to be viewed as a subject matter expert. You’ll need to back up your words, but if you’re constantly learning new things that’s not a problem.

On the Job Experience

Nothing can beat actual on-the-job experience. I encouraged all attendees to take advantage of co-op / internship programs to find out more about how their desired industries operate in the day to day. Find out if you’ll enjoy programming for the rest of your life as quickly as you can to avoid a costly change down the road.

Outside of working for other companies, you can do things to showcase your aspiration and talent by tinkering on side projects or even contributing to open source development. As you learn more about programming languages, libraries, and frameworks you’ll be introduced to an entire world of opportunities to show off. Take advantage of it.

Finally, feel free to reach out to the company’s you admire and ask if you can learn more about how they work. You may even be able to hang out and shadow them for a day to learn more about what skills they are looking for so you can direct your own personal education.