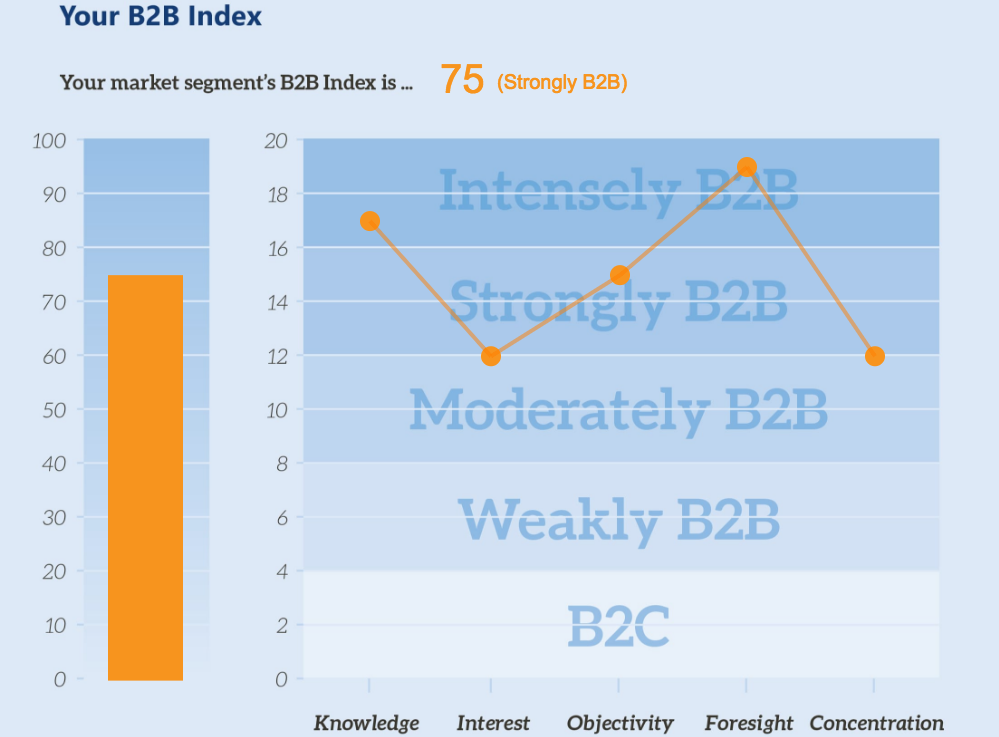
Recently we were tasked with creating a dynamic chart and graph for a client who is in the B2B Coaching space. They wanted this chart in a dynamically created PDF as well as in their responsive web application. In this post, we’ll talk about how we solved this problem in their responsive web application using zero Javascript dependancies for an added performance win.
Finished Product
You can view all of the code related to this post on Codepen with this link.
See the Pen Responsive Charting and Graphing with the HTML5 Canvas Element by Byron Delpinal (@coffeeandcode) on CodePen.
Client Application: https://b2bmarketview.theaiminstitute.com/
Fair Warning: This post is going to be dry and code-heavy, but there’s some pretty cool stuff in there if you can stick with me.
Technical Requirements
- We will use an image for any static content with-in the charted area.
- The dynamic content will be generated by vanilla Javascript to mitigate the need for bringing in any external libraries.
- All measurements when drawing will be percent-based to keep the drawing responsive.
- The dynamic content will be stored as
data-attributes on the canvas element.
Markup
We want to be as minimal as possible here. The bare-bones of what we need are an image, a container to hold that image that will resize to be the exact size of the image, and a placeholder for the canvas drawing.
<div class="b2b-graph-container">
  <img alt="B2b index graph" class="b2b-graph" src="/pathtoyourimage/image.png"/>
  <canvas data-aggregate="58" data-knowledge="14" data-interest="7" data-objectivity="6" data-foresight="11" data-concentration="20" id="graph-canvas"></canvas>
</div>
Javascript
There is a lot of Javascript required to make this work. I tried my best to keep things modular and abstract things when it made sense. Hopefully this will make this a bit easier to digest.
The initial JSON objects used to store the known values of the bar graph and each line graph point:
var barGraphElement = {
    maxAmount: 100,
    scoreAttribute: 'data-aggregate',
    width: 7.5,
    xCoord: 10.8,
    yScale: 10
  },
  lineGraphElementList = [{
    maxAmount: 20,
    scoreAttribute: 'data-knowledge',
    width: 1.25,
    xCoord: 37,
    yCoord: 0,
    yScale: 2
  }, {
  // All other points on the line graph
  ...
  }];
When our page is loaded, our application.js file runs conditional code to see if we need to draw our graph on this page or not. That looks like this:
var canvasElement = document.querySelector('#graph-canvas'),
    graphElement = document.querySelector('.b2b-graph-container');

if (canvasElement && graphElement) {
  drawGraph(window, graphElement, canvasElement);
}
This separates our concerns a bit having the application logic finding the required elements and passing them into our actual drawGraph function. Our drawGraph doesn’t necessarily care about what the elements are, or what context is used, it only knows about drawing the graph.
When we know that we should be drawing our graph on this page, we need to wait for our image to load before doing anything else. There’s a .complete method for images that can be used like this:
var imgElement = container.querySelector("img");

if (imgElement.complete) {
  // The image is already loaded!
  initializeDrawing()
} else {
  // The image is not loaded, let's attach an event handler to it
  imgElement.addEventListener('load', initializeDrawing, false);
}
Our initializeDrawing function handles the main logic flow, here it is, I’ll break it down below:
var initializeDrawing = function     initializeDrawing() {
  var context = canvas.getContext('2d');

  resizeAndPositionCanvas(canvas);
  updateContainerOffsets();

  // Set the stroke color
  context.fillStyle = '#ed1c24';
  context.strokeStyle = 'rgba(255,0,0,0.5)';

  // Draw the overall score
  drawOverallScore(context);

  // Draw the bar graph
  drawBarGraph(context);

  // Draw the line graph
  for (var i = 0, l = lineGraphElementList.length; i < l; i++) {
    var currentItem = lineGraphElementList[i],
      previousItem = lineGraphElementList[i-1];

    // Draw the current point on the graph
    drawLineGraphPoint(context, currentItem);
    // Draw a line from the current point to the previous point
    drawLineGraphLine(context, currentItem, previousItem);
  }

  global.addEventListener('resize', resize, false);
}
The first thing that we do is grab the 2D canvas context that we will pass around and use to draw everything we need to on the canvas element.
Next we’ll need to position the canvas directly on top of the image, so the resizeAndPositionCanvas() function takes the canvas element and manually sizes it to be 100% of the parent container of the image.
After that, we call the updateContainerOffsets() function that updates the canvasContainerOffsets object that we’ll be using later on.
After we’ve changed our drawing colors to red, it’s time to start putting some things on our graph! To do this responsively, there’s one key concept that we need to understand: Everything must be measured in a percent based on the parent container.
Diving right into the drawOverallScore() function, we see this:
var drawOverallScore = function drawOverallScore(context) {
  context.font = getPixelWidthFromPercent(4) + "px Arial";
       context.fillText(canvas.getAttribute(barGraphElement.scoreAttribute),
  getPixelWidthFromPercent(44),
  getPixelHeightFromPercent(15.5));
  };
It’s pretty straight forward, we’re just using the fillText function to put the text on the page. The weirdness comes from converting our percentages into pixels, which we’ve abstracted away into the getPixelWidthFromPercent() and getPixelHeightFromPercent() functions. Here they are:
var getPixelHeightFromPercent = function getPixelHeightFromPercent(percent) {
  return canvasContainerOffsets.height * (percent/100)
};

var getPixelWidthFromPercent = function getPixelWidthFromPercent(percent) {
  return canvasContainerOffsets.width * (percent/100)
};
Remember talking about seeing the canvasContainerOffsets object again later? Here it is. Anytime the screen is resized, we recalculate the width and height of the parent container so we can use them at anytime to convert percentages to pixels quickly. That code looks like this:
// Add the event listener
global.addEventListener('resize', resize, false);

// Handle the callback
var resize = function resize(event) {
  updateContainerOffsets();
};

// Update the offsets
var updateContainerOffsets = function updateContainerOffsets() {
  var parentElement = container;

  canvasContainerOffsets = {
    height: parentElement.offsetHeight,
    width: parentElement.offsetWidth
  };
}
Now, we can draw the bar graph:
var drawBarGraph = function drawBarGraph(context) {
  var currentItemScore = canvas.getAttribute(barGraphElement.scoreAttribute);

  context.beginPath();

  var distanceFromTop = calculateDistance(barGraphElement.maxAmount-currentItemScore, barGraphElement.yScale);
  var barHeight = calculateDistance(currentItemScore, barGraphElement.yScale);

  context.rect(getPixelWidthFromPercent(barGraphElement.xCoord),  getPixelHeightFromPercent(universalDistanceFromTop + distanceFromTop),
    getPixelWidthFromPercent(barGraphElement.width),
    getPixelHeightFromPercent(barHeight));

  context.fill();
};

var calculateDistance = function calculateDistance(score, scale) {
  var distanceBetweenEachMarker = 6.2;

  return (score / scale) * distanceBetweenEachMarker;
};
Admittedly, that context.rect() call is a bit weird, so I’ll dissect it a bit. If you check out the canvas rect documentation you’ll see that the parameters are .rect(x, y, width, height) – so we’re defining the x and y starting points, and then the width and height from there. Recall that our barGraphElement has maxAmount, width, xCoord, and yScale properties on it. These, along with the scoreAttribute from our data- attributes will be what we need to complete our goal here. The width is a set percentage, as is the xCoord.
Because of the nature of the .rect() method we will start from the top of the shape and define it from there, this means that we must figure out where the top of a dynamically sized shape. This may seem odd at first, but because we have a background image with horizontal markers on it, the problem isn’t too difficult. It work out to something like this:
((maxAmount - currentScore) / (maxAmount / numberOfMarkers) * distanceBetweenEachMarker) + universalDistanceFromTop
(maxAmount - currentScore) – This gives us the amount of distance from the top of where the bar graph will be, to the top of the bar graphs maximum amount. If our score was 60, we know that it’s 40 from the top. We have to then divide that by the scale. The scale is calculated by seeing how many markers we have (10) and dividing that by the maximum score (100) – in this case, our scale is 10. After we have that, we multiply it all by the distance between each marker to get the final distance as a percentage between the top of the bar graph and the top of the maximum bar graph. Finally, we add the distance from the top of the bar graph to the top of the page. At this point, we know where the top left corner of our bar graph will be, as a percent based on our full image. This is all handled in the above drawBarGraph() and calculateDistance() functions.
As it turns out, we can apply that same logic to draw all of the other things that we need to on our graph. The only two things remaining are the line graph points of intersection, and the lines themselves.
We see above in the initializeDrawing() function that we are looping through each point and using the current item to draw the point, and the current + previous point to draw the line. Here are those functions:
var drawLineGraphPoint = function drawLineGraphPoint(context, currentItem) {
    var currentItemScore = canvas.getAttribute(currentItem.scoreAttribute);
    // We  inverted the coordinates by subtracting it from the maximum since (0,0) is in the top left of the coordinate plane:
    var distanceFromTop = calculateDistance(currentItem.maxAmount-currentItemScore, currentItem.yScale);
    //Since the y distance is only the distance from the top of the plane to the value, we account for the  top buffer of space as well:
    currentItem.yCoord = universalDistanceFromTop + distanceFromTop;

    context.beginPath();

    context.arc(getPixelWidthFromPercent(currentItem.xCoord),
    getPixelHeightFromPercent(currentItem.yCoord),
    getPixelWidthFromPercent(currentItem.width),
      (Math.PI/180)*0,
      (Math.PI/180)*360,
      false);

    context.fill();
};

var drawLineGraphLine = function drawLineGraphLine(context, currentItem, previousItem) {
  if (!previousItem) {
    return;
  }

  context.beginPath();
  context.lineWidth = 4;

  context.moveTo(getPixelWidthFromPercent(previousItem.xCoord), getPixelHeightFromPercent(previousItem.yCoord));
  context.lineTo(getPixelWidthFromPercent(currentItem.xCoord), getPixelHeightFromPercent(currentItem.yCoord));

  context.stroke();
};
So now, we’ve drawn our score onto our graph, our bar graph, and our line graph. Presto, they now work on all screen sizes, using no external Javascript dependencies. Performance win, responsive win, all around win.
If you’d like to learn more about how responsive and performance based approaches can build better web software, we’d love to talk. Please visit us at www.coffeeandcode.com.


